
Discover the creative process of crafting Lightning McQueen’s chocolate mold, focusing on the eyes and mouth. This project combines precision and artistry to recreate the beloved character’s features. Perfect for fans and chocolate enthusiasts, it offers a fun and rewarding experience to bring Lightning McQueen to life in chocolate form. Follow the guide to learn how to create this stunning chocolate piece using fondant and chocolate. This introduction sets the stage for the detailed steps and tips provided in the following sections.
Overview of Lightning McQueen Chocolate Mold
The Lightning McQueen Chocolate Mold is a delightful project for chocolate enthusiasts and fans of the beloved Disney character. It involves creating intricate details like eyes, mouth, and headlights using fondant and chocolate. The process requires precision and creativity to replicate Lightning McQueen’s iconic features. With the right tools and materials, you can craft a stunning chocolate piece that captures the character’s charm. This project is perfect for both beginners and experienced crafters, offering a fun way to combine chocolate making and fondant shaping. The end result is a visually appealing chocolate mold that can be used for themed parties, gifts, or as a unique dessert decoration.
Importance of Using the Right Tools and Materials
Using the right tools and materials is crucial for achieving professional-looking results with the Lightning McQueen Chocolate Mold. High-quality chocolate molds ensure precise details, while the correct consistency of fondant guarantees smooth, even application. Proper tools, like fondant cutters and smoothers, help create sharp edges and seamless finishes. Additionally, using food-grade materials ensures safety and durability. The right chocolate type and melting tools prevent issues like uneven pouring or brittleness. Investing in quality supplies not only enhances the final product’s appearance but also makes the process more enjoyable and stress-free. This attention to detail is essential for capturing Lightning McQueen’s iconic features accurately.

Materials Needed
Gather essential materials like the Lightning McQueen chocolate mold set, white and blue fondant for eyes, yellow fondant for headlights, and chocolate melting supplies for smooth results.
Chocolate Mold Set for Lightning McQueen Eyes and Mouth
The chocolate mold set is a crucial tool for creating Lightning McQueen’s iconic features. It includes detailed cavities for the eyes and mouth, ensuring precise and professional results. Made from durable, food-safe materials, the mold is easy to use and clean. Its design allows for smooth chocolate flow, minimizing air bubbles. Perfect for both beginners and experienced chocolatiers, this mold brings the character to life; Properly cared for, it can be reused multiple times. For best results, pair it with high-quality chocolate and fondant. This set is essential for achieving the desired shape and detail for Lightning McQueen’s expressive features.
White and Blue Fondant for Eyes
White and blue fondant are essential for creating Lightning McQueen’s expressive eyes. The white fondant is used for the sclera, providing a clean base, while the blue fondant shapes the iris, adding color and detail. Roll small balls of blue fondant and flatten them slightly to fit the mold’s eye cavities. Use a round nozzle or a small cutter to achieve a perfect circle. The white fondant can also be used for highlights, giving the eyes a lifelike sparkle. Properly kneaded fondant ensures smooth application and prevents cracking. These colors bring the character’s iconic look to life, making the eyes a focal point of the chocolate mold design.
Yellow Fondant for Headlights
Yellow fondant is crucial for crafting Lightning McQueen’s iconic headlights, adding a vibrant and recognizable detail to the chocolate mold. Roll small portions of yellow fondant into tiny balls and gently flatten them to create the headlights’ shape. These small pieces are then placed strategically on the chocolate mold to replicate the character’s front lights. Ensuring the fondant is pliable and smooth is key for achieving a clean, even appearance. Once set, the yellow fondant headlights bring a pop of color and authenticity to the design, making them a standout feature of the finished chocolate piece. This step enhances the overall likeness and charm of Lightning McQueen’s face.
Chocolate Melting Supplies
To achieve smooth and professional results, the right chocolate melting supplies are essential. A double boiler or a microwave-safe bowl is ideal for melting chocolate evenly. High-quality chocolate chips or candy melts are recommended for their consistent texture and flavor. A thermometer ensures the chocolate reaches the optimal melting temperature, preventing it from burning. A spatula is necessary for pouring the melted chocolate into the mold. Optional tools include a whisk for mixing and flavor extracts or coloring to customize the chocolate. Proper preparation and the right supplies guarantee a flawless base for Lightning McQueen’s chocolate mold, making the process enjoyable and the outcome impressive.

Step-by-Step Instructions
Begin by melting chocolate and preparing fondant for Lightning McQueen’s features. Shape the eyes and mouth, add details like pupils, and assemble everything in the mold. Ensure proper adhesion and allow the chocolate to set for a polished finish. Follow each step carefully to achieve professional results. This guide provides a clear pathway to creating a stunning chocolate piece. With attention to detail and patience, you’ll craft a delightful Lightning McQueen chocolate mold. Each step is designed to be easy to follow, making the process enjoyable and rewarding. Create your masterpiece with confidence and precision. The final result will be a charming chocolate figure.
Preparing the Fondant for Eyes and Mouth
Begin by kneading the white and blue fondant until pliable. Divide the white fondant into two equal portions for the eyes and mouth. Roll each portion into thin circles for the eyes and a thin rope for the mouth. Use a small round cutter or a toothpick to create pupils. Shape the blue fondant into tiny circles for the irises and press gently onto the white eye bases. For the mouth, shape the white fondant into a curved line, adding small teeth marks with a toothpick. Allow the fondant shapes to set slightly before assembling. This step ensures all pieces are ready for precise placement on the chocolate mold, creating a lifelike appearance for Lightning McQueen’s features.
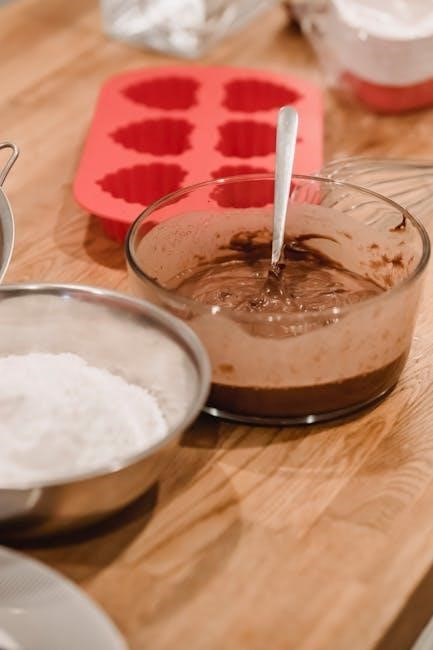
Melting Chocolate for the Mold
Melt the chocolate using a double boiler or microwave-safe bowl in short intervals, stirring between each heating. Ensure the chocolate reaches a smooth, even consistency without overheating. Once melted, pour the chocolate into the Lightning McQueen mold, filling it about ¾ of the way. Tap the mold gently to remove air bubbles, ensuring a seamless finish. Allow the chocolate to set slightly before proceeding. Properly melted and tempered chocolate is essential for a glossy finish and durability. Avoid overfilling, as this can cause the chocolate to spill over during cooling. Let the chocolate set completely before adding fondant details for the eyes and mouth.
Creating the Eye Shape with Fondant
Roll small pieces of blue fondant into thin circles and flatten them slightly to form oval shapes for Lightning McQueen’s eyes. Use a round nozzle or a small cookie cutter to achieve a precise circular shape for the white fondant, which will serve as the base of the eyes. Place the white fondant circles on top of the blue ovals, ensuring they are centered. Gently press the fondant to adhere it securely. Smooth out any edges or air bubbles using a fondant tool or your fingers. This step is crucial for achieving the character’s distinctive eye shape. Allow the fondant to firm up slightly before moving on to the next step. Properly shaped eyes are essential for capturing Lightning McQueen’s expressive look.
Adding Details to the Eyes (Pupils and Eyelids)
To add pupils, use a toothpick or a small fondant tool to create a dot in the center of each white fondant circle. For a more defined look, you can also paint the pupils with edible black fondant or food-grade markers. Next, shape thin strips of black fondant into curved lines and attach them above the eyes to form the eyelids. Ensure the eyelids are evenly spaced and symmetrical for an authentic Lightning McQueen appearance. Gently press the fondant details to secure them in place. Allow the fondant to set before handling the eyes further. These small details bring life to the character’s face, capturing its iconic expression. Precision is key to achieving the desired look.
Shaping the Mouth with White Fondant
Roll out a small portion of white fondant to a thin sheet, ensuring it is pliable and easy to shape. Use a sharp knife or fondant cutter to create a curved line that matches the shape of Lightning McQueen’s iconic mouth. Carefully trim any excess fondant to refine the edges. To attach the mouth to the chocolate mold, apply a small amount of melted chocolate or water to the back of the fondant piece and press it gently into place. Adjust the position to align with the eyes for a balanced look. Smooth the edges with a fondant tool or your fingertips to ensure a seamless fit. This step adds character and personality to your Lightning McQueen chocolate mold, making it instantly recognizable.
Assembling the Eyes and Mouth on the Chocolate Mold
Once the chocolate is set in the mold, carefully place the prepared eye pieces into their designated areas, ensuring symmetry and proper alignment. Gently press the fondant eyes into the chocolate to secure them. Next, position the white fondant mouth below the eyes, aligning it with the mold’s design. Use a small amount of melted chocolate or water to attach the mouth securely. Adjust the placement to ensure the features are evenly spaced and visually appealing. Use a toothpick or fondant tool to fine-tune the alignment if needed. Allow the assembly to set for a few minutes before handling. This step brings the character to life, creating a recognizable and charming Lightning McQueen chocolate piece.
Allowing the Chocolate to Set
After pouring the melted chocolate into the mold and assembling the eyes and mouth, place the mold on a flat surface in a cool, dry environment. Avoid refrigeration, as it can cause the chocolate to bloom or develop streaks. Let the chocolate set for 10-15 minutes or until it hardens completely. Once set, carefully remove the chocolate piece from the mold. If the chocolate sticks, gently warm the mold with your hands or use a hairdryer on a low setting. Allow the chocolate to cool slightly before handling to ensure it retains its shape. Proper setting ensures a smooth and professional finish, making the Lightning McQueen chocolate mold ready for display or gifting.

Tips and Tricks
Use the right consistency of fondant to ensure smooth shaping. Avoid air bubbles when pouring chocolate for a flawless finish. Properly adhere fondant details to chocolate for durability.
Using the Right Consistency of Fondant
Achieving the correct fondant consistency is crucial for detailed work. If the fondant is too sticky, knead in a small amount of cornstarch or powdered sugar. If too dry, add a drop of water. Proper consistency ensures smooth shaping and prevents cracking. For Lightning McQueen’s features, like the eyes and mouth, a slightly firmer fondant is ideal for maintaining sharp details. Always knead the fondant thoroughly before use to activate the ingredients, ensuring pliability. Store unused fondant in an airtight container to maintain its texture. Properly prepared fondant will adhere well to chocolate and hold intricate designs, making your Lightning McQueen mold look professional and polished.
Avoiding Air Bubbles in the Chocolate Mold
To ensure a smooth, professional finish, it’s essential to prevent air bubbles from forming in the chocolate mold. Gently tap the mold on the countertop after pouring in the melted chocolate to release any trapped air. Use a spatula or spoon to spread the chocolate evenly, filling all cavities. Work slowly to avoid introducing bubbles during the pouring process. If bubbles appear, lightly prick them with a toothpick or the tip of a knife while the chocolate is still melted. Allowing the chocolate to set undisturbed will help maintain its integrity. A bubble-free surface ensures that the Lightning McQueen design will be crisp and detailed once the chocolate hardens and is removed from the mold.
Ensuring Proper Adhesion of Fondant to Chocolate
For the fondant to adhere smoothly to the chocolate, ensure the chocolate surface is clean and dry. Lightly press the fondant pieces onto the set chocolate, starting from the center and moving outward to avoid air pockets. A small dab of melted chocolate can be used as an adhesive, applying it to the back of the fondant before placing it on the mold. Make sure the fondant is at room temperature and not too sticky or dry, as this can affect adhesion. Gently press the edges to secure them firmly. Allow the fondant to set slightly before handling to ensure a strong bond. Proper adhesion ensures the details stay intact when the chocolate is removed from the mold.
Safety Precautions
Handle hot chocolate carefully to avoid burns. Store fondant and chocolate in a cool, dry place to maintain quality and prevent spoilage.
Handling Hot Chocolate Safely
When working with hot chocolate, prioritize safety to avoid burns or accidents. Always use oven mitts or tongs to handle the chocolate mold, as it may become extremely hot during the melting process. Place the mold on a heat-resistant surface to prevent damage or accidental spills. Keep children away from hot chocolate and melting equipment. Never leave hot chocolate unattended, as it can cause fires or burns if spilled. Use a thermometer to monitor the temperature and ensure it doesn’t exceed safe levels. When pouring hot chocolate into the mold, do so slowly and carefully to avoid splashing. If you notice any spills, allow them to cool before cleaning. Always test the temperature of the chocolate before handling it directly to prevent burns.
Storing Fondant and Chocolate Properly
To maintain the quality of fondant and chocolate, proper storage is essential. Fondant should be stored in an airtight container at room temperature, away from direct sunlight and moisture. Avoid refrigerating fondant, as it can become too hard to work with. For chocolate, store it in a cool, dry place, ideally between 15°C and 20°C (59°F to 68°F). Keep it away from direct sunlight and strong-smelling foods, as chocolate can absorb odors easily. If you won’t be using the chocolate immediately, wrap it tightly in plastic wrap or aluminum foil and place it in an airtight container. Proper storage ensures both fondant and chocolate remain fresh and ready for your Lightning McQueen project.

Troubleshooting Common Issues
Common issues include uneven chocolate pouring, air bubbles, and fondant cracking. To fix, tap molds gently for air bubbles and smooth fondant cracks with a tool.
Fixing Uneven Chocolate Pouring
Uneven chocolate pouring can be addressed by gently tapping the mold to eliminate air bubbles, ensuring a smooth flow. If the chocolate is too thick, warming it slightly may improve its consistency. Pouring in a steady, controlled manner and using a spatula to guide the chocolate can help achieve an even coat. After pouring, tilt the mold gently to spread the chocolate uniformly. If unevenness persists after setting, melt a small amount of additional chocolate and carefully touch up the affected areas. This method helps maintain the intricate details of Lightning McQueen’s features while ensuring a professional finish.
Repairing Cracks in Fondant Shapes
If cracks appear in your fondant shapes, gently apply a small amount of shortening, such as vegetable shortening, to the affected area. Use your finger or a fondant tool to press the edges together, ensuring they align properly. If the crack is stubborn, lightly dampen the area with a touch of water or edible glue and smooth it out. Allow the repaired area to set for a few minutes before handling. To prevent cracks, ensure your fondant is at room temperature and not too dry. Proper storage and handling of fondant are key to maintaining its pliability and preventing cracks in your Lightning McQueen chocolate mold details.
Presentation Ideas
Display the finished Lightning McQueen chocolate mold on a themed backdrop or decorative stand. Use it as a centerpiece for themed parties or wrap it as a creative gift.
Displaying the Finished Chocolate Mold
Once your Lightning McQueen chocolate mold is complete, showcase it creatively to highlight its details. Place it on a decorative stand or themed backdrop to draw attention. Use bright lighting to enhance the colors and textures of the chocolate and fondant. For a themed presentation, surround it with Disney Cars-themed decorations or small toy cars. Consider adding a clear protective cover to prevent dust or damage. If gifting, wrap it in elegant packaging with a ribbon and a personalized note. This display method ensures your chocolate mold stands out as a unique and thoughtful creation, perfect for parties, gifts, or special occasions.
Using the Mold for Themed Parties or Gifts
Your Lightning McQueen chocolate mold is perfect for themed parties or as a unique gift. Use it to create personalized treats for Disney Cars-themed events, adding a touch of excitement to party favors or cake decorations. The mold’s design makes it an ideal centerpiece for birthday celebrations or special occasions. Consider packaging the finished chocolates in themed boxes or bags with custom labels to enhance the gift-giving experience. It’s also a thoughtful present for fans of the franchise, offering a sweet and creative way to celebrate their love for Lightning McQueen; This versatile mold ensures your creations bring joy to both kids and adults alike.
Related Projects
Expand your creativity with related projects, such as creating a full Lightning McQueen cake or crafting fondant shapes for other beloved characters. These projects allow you to explore new techniques while building on the skills learned from this mold. Consider experimenting with different themed molds or designing custom chocolate gifts for special occasions. Each project offers a chance to innovate and bring iconic characters to life in edible form, making them perfect for themed parties, personal gifts, or even starting a small creative business. The possibilities are endless, and these related projects will keep your creativity racing.
Creating a Full Lightning McQueen Cake

Take your creativity to the next level by crafting a full Lightning McQueen cake, inspired by the iconic character from Pixar’s Cars. This project involves baking a cake, typically in a rectangular pan (9×13 inches), and shaping it to resemble Lightning McQueen’s sleek car design. Once baked, the cake can be layered and carved to achieve the desired shape. Use vanilla or chocolate cake recipes for the base and stack layers with dowels or skewers for stability. Cover the cake with buttercream frosting to smooth out the surface. Fondant is then molded and applied to create details like the car body, headlights, and windshield. Colored fondant can be used to replicate Lightning McQueen’s signature red and yellow accents. Additional details, such as the eyes and mouth created from the chocolate mold, can be attached to the cake for a lifelike appearance. Smaller fondant or gum paste pieces can be shaped into wheels, a bumper, and other decorative elements. This project is perfect for themed parties or as a unique gift for fans of the character.
Using Fondant for Other Character Molds
Fondant is a versatile medium that can be used to create a wide variety of character molds beyond Lightning McQueen. Its pliable nature allows for intricate details, making it ideal for crafting faces, accessories, and decorative elements for other beloved characters. Whether you’re creating superhero logos, cartoon figures, or movie icons, fondant can be shaped, colored, and molded to achieve the desired design. By mastering the techniques used for Lightning McQueen’s eyes and mouth, you can apply similar methods to other characters, expanding your creative possibilities. This skill is especially useful for themed celebrations or custom gifts, allowing you to bring favorite characters to life in edible form.